1. Setting up the Environment
Summary
- Install SourceTree
- Clone Data Repository
- Get CMO Content Generator
- Set up the ini file
- Install oXygen Author Add-On
1.1. Set up SourceTree
SourceTree is a client software for the version control system Git and Mercurial. Because the databased is stored within a central Git repository you will need SourceTree or another Git client software to interact, e.g. pull and push the latest changes.
- Get SourceTree from www.sourcetreeapp.com/.
- Install SourceTree on your local system.
- Enter your credentials.
- Clone the database repository.
To clone the repository, click on the button Clone / New. Then enter the following link to the repository: https://git.dfkg.org/git/cmo_data.git.
Then choose a directory on your local hard drive where the copy of the database will be stored. If you add the database or the test database for the first time, please enter the given user credentials into to pop up window.
As soon as the information is entered, finish the process by clicking on Clone. Now the database repository should be shown in the list of existing repositories. For further information on the usage of SourceTree, see Using SourceTree
Attention: After a 30 days trial you will have to register your version of SourceTree. You don't have to pay for this registration but have to create an online account. Please follow the instructions of SourceTree.
1.2. Set up CMO Content Generator
To set up the Content Generator, first get the newest version from the Cloudshare folder. Unzip the folder to a local directory on your computer. If you're updating the Content Generator, replace the cmoCG.ini file within the folder with your old ini file.
If you configure the Content Generator for the first time, you have to configure the cmoCG.ini file within the folder:
The ini file contains the configuration to interact with your local file system and the git reposiory. It consists of two parts:
The part of the file below "[git]" contains the encrypted login data for the git repository. These parts should not be modified!
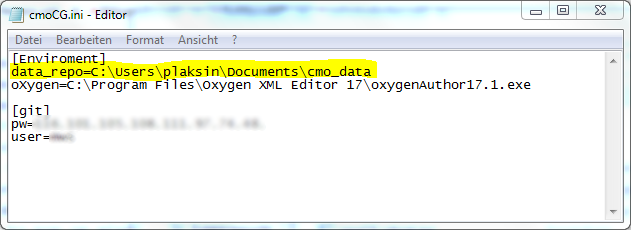
The top part of the file below "[Enviroment]" contains two directories, the path to your local working directory (see About Git) and the installation path of your oXygen Author executable. If you didn't change any settings within the installation process of oXygen, this path should work without any modifications.
The path to the data_repo should be modified while configuring the Content Generator. You have to insert as value the path to your local working directory of your database repository. This path was determined while cloning the repository to your computer using SourceTree (see above).
If you forgot this path, open again SourceTree and look in the list of existing repositories at the left. The path is written there with grey letters after the name of the repository:

After you entered this path as a value in the marked position of the ini file (see graphic above), save your changes and close the file. Now your version of the Content Generator should work.
To make things easier, it is possible to create a shortcut of the cmoCG.exe on your desktop.
1.3. Set up oXygen Author
First, you have to install and register the oXygen XML Editor properly on your computer. The package consists of three main software components, the XML Editor (blue icon), the XML Developer (silver icon), and the XML Author (red icon). The program you will use mostly - because it is the easiest to use - is the oXygen XML Author.
If you want to have further information about using the oXygen XML Author, see the video tutorial by SyncRO Soft or the oXygen XML Author User Manual.
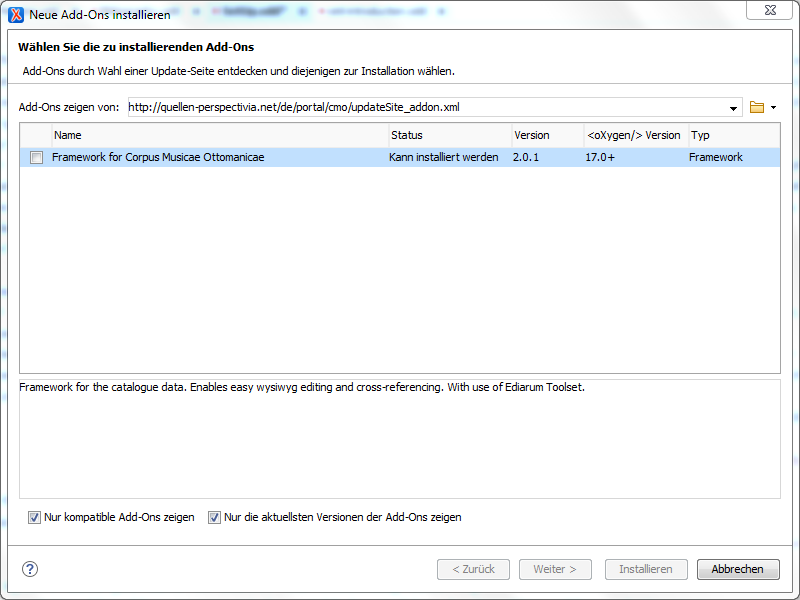
To use all the special CMO related functionality, you have to install the CMO Framework Add-On. The process of installing and updating Add-ons is described in the User Manual.
As update site you have to insert the following link:
http://quellen-perspectivia.net/de/portal/cmo/updateSite_addon.xml
Now the Add-on should appear in the list:
To install the framework add-on click on the checkbox in the list an proceed. In the next step you have to accept the (on exsiting) license agreements by checking the box on the bottom of the window and proceed.
A popup will appear on the screen, informing you that your are about to install an unsigned third party add-on. Click on Continue anyway to proceed.
Now you will be informed of the successful installation of the add-on. To get access to the new features you have to restart the application. With this step the set up of the database environment is finished.
2. Using SourceTree
2.1. Short notes on git version control
Version control system were once developed to support software engineers working in a team on large projects. Their aim is to prevent conflicting versions of files and enable working as a team on the same project. To achieve this, they provide technical solutions to observe files, to store them on one or more server repositories, and to store not only a file itself but the change history of a file. One of these version control system is Git. Each version control system distinguishes in general a local working directory and server repositories, only the possible connections and interaction between them differ.
Git can be used as a single standalone local repository without any server connection, therefor the storing of the changes and the interactions with a server-side repository are different parts of the workflow. A local repository stores changes of files as so called commits. After some changes are made, the changed files are staged and then the changes should be stored as a commit. You could imagine it as an archive consisting of boxes. Each commit is a box which need do be packed and labelled before it could be stored. Within text based files such as XML files the changes are stored per line, so that two versions of a single file could be merged automatically when different lines are affected. Only in the case of conflicts affecting the same line of a file or binary files, e.g. images and more complex files, manual interaction will be needed.
Interacting with a server-sided copy of a repository works only based on the commits made. Unstanged and/or uncommited changes will not be sent to the repository or - worse - will be overwritten in case of synchronising. To get the latest version from a server-side repository is called "Pull" and sending your own changes to another copy of a repository is called "Push".
For a more technical approach to version control with Git, these tutorials are a good starting point: www.atlassian.com/git/tutorials and Git Basics Youtube Videos
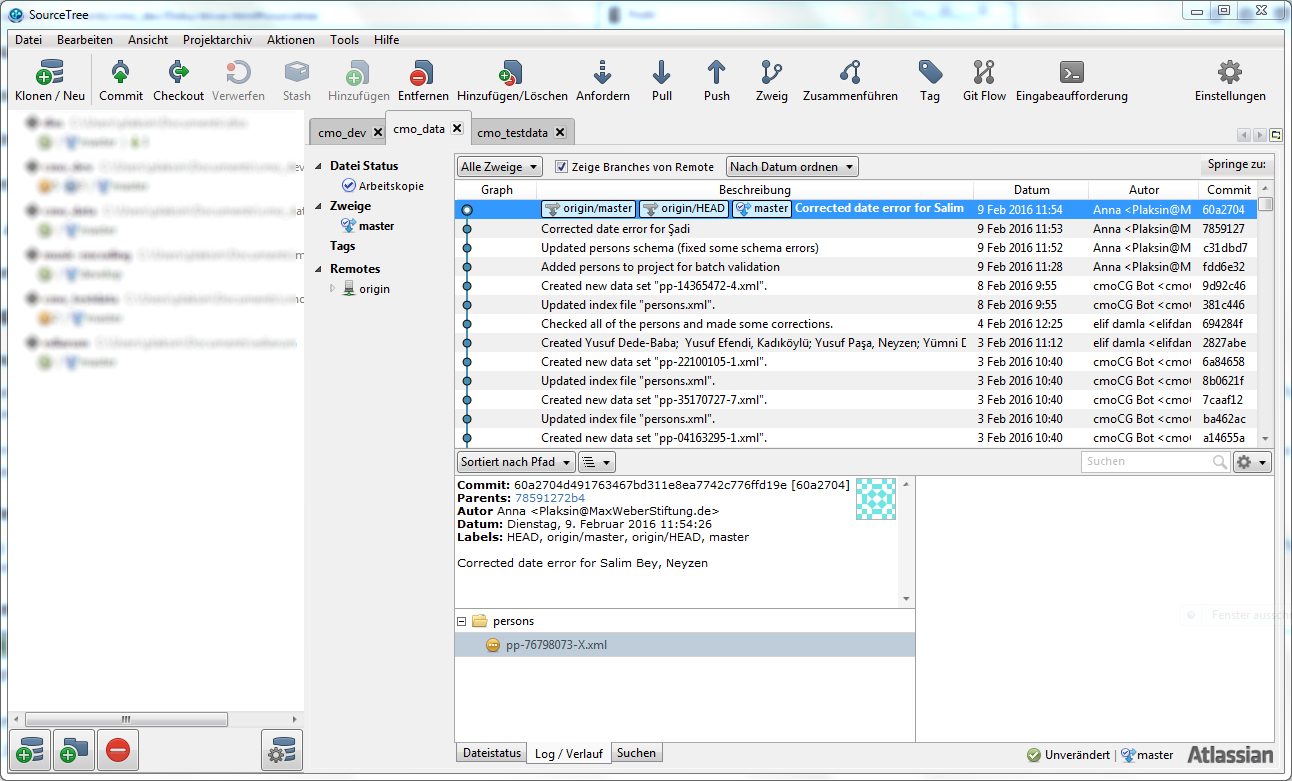
2.2. The main window of SourceTree
The window of SourceTree consists of three parts: the button bar on the top, the list of repositories on the left, and the overview of an opened repository on the right. When you start the application you will see the overview of the branches of the current repository. This view consists of the list of commits with description, date, author and commit number and a detailed view of a commit. The detailed view of a marked commit will be shown under the list. It contains the infos of the commit, the affected files and a short summary of the stored changes.
The other main view to be used when working with SourceTree is the Working directory view. If all changes are stored as commits, this view is usually empty. It gives you an overview of the status of the files. With a click on the dropdown on the top, you could choose which files should be shown and how should they be sorted. Usually only pending files are shown.
If files are shown in this view it is divided in three parts, the stanged files on the top left, the unstaged files below. If you want to stage files, click on the checkboxes or use drag-and-drop. If a file is marked, on the right side will appear a summary of the not yet commited changes.
On the bottom of the view is the commit message line situated. It will expand either if you click on commit or if you just click on the line itself. After you staged the files you want and inserted a commit message you can click on the Commit button to commit your changes to your local repository.
2.3. Pull - Getting the latest version of the repository
Before starting to work on the database it is highly recommended first to pull the newest version from the server repository.
To pull from the repository click on the button Pull. On the now opened dialogue window you could now choose from which remote you want to pull into which branch - see www.atlassian.com/git/tutorials for more information about remotes and branches. Mostly you could just click okay to proceed.
It is also possible to just check for updates without pulling them into your local working directory. Perform a Fetch instead by clicking on the corresponding button. By confirming the fetch will be performed.
2.4. Commit and Push - Storing your changes
For pushing your latest changes to the server repository, you first have to commit all your changes.
To commit your changes click on the corresponding button or change to the working directory view.
First you have to stage the changed files by using the checkboxes or drag-and-drop. If their are a lot of changes to stage, it is recommended to perform more than one commit and divide the changes logically.
After the files for a commit a staged, type in the commit message into the message box - expand the box by clicking into it. The commit message should explain the changes made on the files, e.g. "added new birth date to John Doe". There are no rules for commit messages except that you and your colleagues should be able to understand them even after a long while.
Perform the commit by clicking on the Commit button below the textbox.
After commiting all the changes made on the database, push them to the server repository by clicking on Push. Now it is possible - if needed - to adjust from which branch to which remote branch the changes should be pushed (again, see www.atlassian.com/git/tutorials for more details). In most cases no changes need to be made and the push will be performed once you confirm by clicking on OK.
2.5. Basic conflict management
2.5.1. Some hints to prevent merge conflicts
There are two easy ways to prevent merge conflicts in general. First, always perform a pull when starting to work on the data. Furthermore don't forget to commit an push your changes, it is highly recommendable - also for making changes more trackable - to commit smaller chunks of changes instead of collected a large amount.
To prevent conflicts of single files, it is also useful to agree on who is currently working on a specific portion of data and wait with other changes on the same files until that person finished work.
If big changes should be made, it is also possible to create a new branch to store those and merge them afterwards into the master branch. For more information on branches, see www.atlassian.com/git/tutorials/using-branches/git-branch.
2.5.2. About merge conflicts
Most of the conflict management will be made automatically by the Git technology and don't bother you.
If two people making changes on different files, they commit their changes and push them to the server repository, these changes will be just merged automatically, because the changes were made by different commits. It will always keep the newest version of a file. By pulling a user will get these newest versions of files.
If changes are made on the same file, there will also occur no further problems in cases where the changes are made in different lines of a text-based file. Normally git will merge both changes automatically. Only conflicts affecting the same line of a file needs manual intervention.
2.5.3. Merge two versions of a file
A merge is always needed if you recognize that you have open pulls and pushes - see the red numbers on the corresponding buttons. In that case, please make sure, that all of your changes are commited.
In the next step, pull the latest version from the repository. If the local commits and the updates from the server repository are automatically mergeable, they will be merged. Afterwards click onCommit and SourceTree will guide you to commit this merge. Make sure that all affected files are staged and SourceTree will propose you a proper commit message marking this commit as a merge.
If conflicts on the same line of a file occur, SourceTree will mark the affected files as conflict. An little tutorial dealing with merging conflicts is found on githubtraining.com.
When a file with a conflict is opened, you will notice changes within it documenting the conflicting changes. The safest way to deal with them is to solve them manually, either with a merge tool (see en.wikipedia.org/wiki/Data_comparison) or manually with a simple text editor (don't use wordpad!). To learn more about manual conflict management, see this short tutorial video on vimeo.
Because a merge conflict artifact in a file is an error in the XML structure, it is not possible to solve this in the Author view of oXygen. To solve this conflict you have to work in the XML view. Here is a short explanation how a conflict is marked:
<source xml:id="sc-11662482-1">
<identifier>TMKli (2), p. 20</identifier>
<titleStmt>
<<<<<<< HEAD
<title type="main">Şevkname</title>
<composer>
<persName dbkey="pp-62736630-6">Abdülkadir
Meragi</persName>
</composer>
=======
<title/>
<composer>
<persName dbkey="pp-62736630-6">Abdülkadir Meragi</persName>
</composer>
>>>>>>> 322b2ae24cb4171506ad7e83b0f1c6d24b04cb69
</titleStmt>
<componentGrp/>
<relationList>
<relation rel="isEmbodimentOf"
target="ex-83019493-2" label="CMO_TMKli (2), p. 20"/>
</relationList>
</source>
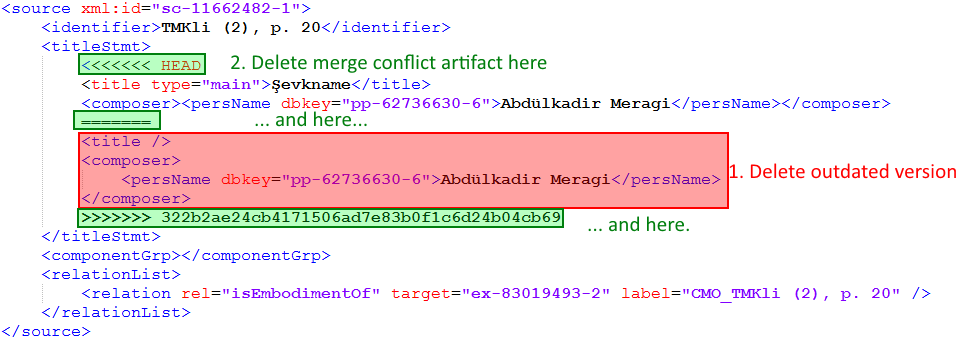
Here is an example of a merge conflict in a source component. Git documents a merge conflict in a certain way.
The conflict begins at the <<<<<<< HEAD and ends with >>>>>>> 322b2ae24cb4171506ad7e83b0f1c6d24b04cb69. Both versions of the file are stored in this artifact, devided by =======. The lines above the divisor are the current version of the repository, the lines underneath it are the version from the current editor's computer which should be pushed. Now, you have to decide which version you want to keep and which you want to delete. In that particular case, we keep the version from the repository (the upper one) because it contains the title and the one below only the composer. The first step is now, to delete the lines we want to delete. Then you have to delete the merge conflict markers. After that procedure, the source component should look like this:
<source xml:id="sc-11662482-1">
<identifier>TMKli (2), p. 20</identifier>
<titleStmt>
<title type="main">Şevkname</title>
<composer>
<persName dbkey="pp-62736630-6">Abdülkadir
Meragi</persName>
</composer>
</titleStmt>
<componentGrp/>
<relationList>
<relation rel="isEmbodimentOf"
target="ex-83019493-2" label="CMO_TMKli (2), p. 20"/>
</relationList>
</source>
Now, you can save the file, commit, and push your latest changes to the repository. Here is also a small graphic summary of the steps:
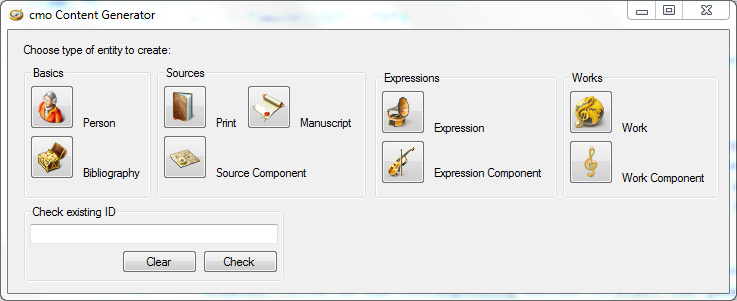
3. Using the CMO Content Generator
The main function of the CMO Content Generator is the creation of new datasets. To accomplish that function it does a couple of things:
- Generate a technical ID for every dataset.
- Creates a template XML file and opens it with the oXygen XML Author.
- Creates an entry within an index file to ensure the uniqueness of a technical ID and to enable the dialogue guided referencing of the CMO oXygen Add-on.
- Push the newly created dataset and the updated index file to the server repository of the database.
To create a new dataset open the Content Generator and choose which type of dataset should be created. Click on the corresponding button to start the generation process.
In the next step, a dialogue opens and asks for more information. In any case you have to enter an identifying label for the new dataset. This label is a self-chosen text string used as a semantic identifier. It will be displayed within the referencing dialogue and on the future web catalogue whereas the technical ID is wholly invisible for the user. To ensure the identifying function of this label, it should be unique and chosen based on a determined labelling system. It should also be not changed within the whole data entering process to ensure the integrity of the index files.
In the case of a newly created bibliographic item, you will choose if the template for a monograph or the template for an article should be used.
In the case of a source component, expression component or work component, you have to choose to which parent dataset the component should belong to. The identifying label of the parent dataset will be pasted into to the text box for an easy labelling process.
After proceeding with a click on OK the new dataset will be created as explained and the new dataset will be pushed to the repository and opened in the oXygen XML Author.
On the bottom of the main window of the Content Generator is also a small text box. In this box, technical IDs could be entered for a validity check. This feature wont check if an ID is assigned yet but only if it has a valid form.
5. Short basics on working with XML files
XML is a markup language defining a set of rules for encoding documents in machine-readable as well a human-readable format. It uses no specific vocabulary to store information but rather provides technologies to use predefined or/and self-defined vocabularies.
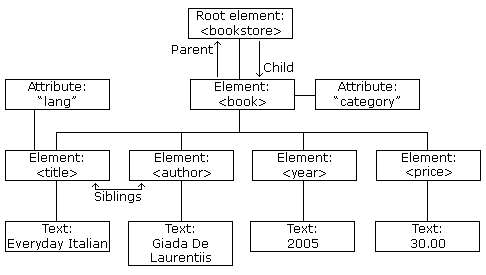
Every XML document consists of an amount of elements within a root element. These elements are written as angle brackets. Every element consists of a starting tag and a closing tag, the content of an element is put in between those. Furthermore elements could be described with so called attributes. They are always part of an element and provides a further description:
<element attribute="value-of-attribute">I am the content of this element</element>
<car fuel="diesel" transmission="automatic">Anna's car</car>
The content of an XML element could be just text and/or more elements. This stacking of elements are commonly described as tree (see further information).
Complex data could be stored in such cascading elements to provide more detailed information, because an element is not only seen by itself but also in the context of its parent elements:
<breakfast_menu>
<food>
<name>Belgian Waffles</name>
<price currency="dollar">$5.95</price>
<description>Our famous Belgian Waffles with plenty of real maple syrup</description>
<calories>650</calories>
</food>
<food>
<name>French Toast</name>
<price currency="dollar">$4.50</price>
<description>Thick slices made from our homemade sourdough bread</description>
<calories>600</calories>
</food>
</breakfast_menu>
5.1. XML schema
XML technology also provides possibilities to define a set of rules which need to be fulfilled to guarantee the automated processability of data. Such an XML schema provides a specific vocabulary to be used as element and attribute name and sets of rules, defining which attributes could be used within an element and what content is allowed within an element. Software applications, e.g. XML editors, are able to check the integrity of an XML file to guarantee a proper processing.
A general rule of every XML is, that it has to be well formed. This means:
- Each starting tag of an element should have a corresponding end tag.
- An element should be properly closed before opening a new element on the same level.
- A document should have only a single element which contains every other element.
A defined schema defines rules which go further, like the grammar of a specific language. It is possible to use XML without defining an own schema, but on a certain level of complexity it is highly recommended to use a schema to provide data integrity. To enable a widespread usability of data, it is also recommended to use not only a self-defined schema but a preexisting one, supported by a large community. By using preexisting schemata it is possible to reuse also provided software technologies for further processing and comfortable editing. Such preexisting schemata are, for example:
- HTML for websites (every webbrowser is an interpreter of HTML)
- SVG for vector graphics
- KML for geographical information (nearly every navigation system understands it)
- TEI for scholarly text encoding
- MEI for scholarly music encoding
For our database we are using basically the schema of the TEI for storing bibliographic data and persons, and the MEI schema for source descriptions, music works and variants (called expressions).
Also this document is written in TEI XML.
5.2. Namespaces
To identify a certain XML vocabulary in a document, or to use more than one vocabulary in the same document, namespaces are used. A namespace name is commonly defined as an URI. This URI hasn't to be a valid link to a web document. It's only function is to provide a unique name for a certain vocabulary, but mostly the URI is under control of the author or organization defining it. Also the namespace URIs are used to link to a human readable description of the defined XML vocabulary.
To use a vocabulary of a certain namespace in a document, it has to be declared in the root element of the document:
<root xmlns="http://www.adventure-works.com">
</root>
If more than one namespaces are used in a document, all used namespaces are declared in the root element and distinguished by a defined prefix. If a namespace is desclared with a prefix, every element of the namespace should start with the declared prefix:
<aw:Root
xmlns:aw="http://www.adventure-works.com"
xmlns:fc="www.fourthcoffee.com">
<fc:Child>
<aw:DifferentChild>other content</aw:DifferentChild></fc:Child>
<aw:Child2>c2 content</aw:Child2>
<fc:Child3>c3 content</fc:Child3></aw:Root>
Namespaces used in the CMO database:
6. Bibliography
6.1. What should be entered as bibliography and how it is used?
A bibliography dataset contains a bibliographic reference to scholarly literature or other secondary sources. It's purpose is only the correct reference of a citation, mostly used for biographical informations of persons.
In contrast any music source, text collection etc. containing information as a primary source should be entered as a print or a manuscript to the database. Sources have a more prominent role within the database because the information to a particular source should be a detailed description rather than just a bibliographic citation.
6.2. Generate a bibliographic item
When generating a bibliographic dataset with the Content Generator, you should choose if the template for a monograph should be used or rather the template for an article. The latter includes a subelement for referencing the containing medium, e.g. an essay collection or a magazine. There is no further difference between these choices.
6.3. Enter a monograph
The template contains basic elements for entering the information for a modern monograph. Because most monographs are either by an author or an editor both elements are optional and could be removed if not necessary. Only title, publication place and publication date are mandatory fields. If the information of one of these fields are not available this fields should be left empty.
6.3.1. Adding additional information
Beyond that is it possible to add special information elements. In the XML view just start to type, in the author view press enter and choose the specific from the list:
- Additional authors
- Additional titles
- Distributor
- Funder
- Sponsor
- Responsibility statement
- Extend
- Weblink
- Text language
- Notes
A full bibliographic item with all possible fields will look like this in the XML view:
<bibl xml:id="bb-00000000-0"
cmo:doctype="bb" cmo:pubReady="false"
xmlns:cmo="http://www.corpus-musicae-ottomanicae.de/ns/cmo">
<idno type="CMO">Example bibliographic dataset with all possible fields</idno>
<author>Author's name</author>
<title xml:lang="tur" type="main">Title</title>
<respStmt>
<resp>Co-Authors</resp>
<persName>Name of a co-author</persName>
<resp>Printer</resp>
<orgName>Name of printing organisation</orgName>
<resp>Another description of any kind of responsibility</resp>
<persName>Name of responsible person</persName>
<orgName>Name of responsible organisation</orgName>
</respStmt>
<editor>Editor's name</editor>
<edition>2nd revised edition</edition>
<publisher>Publisher's name</publisher>
<distributor>Distributor's name</distributor>
<funder>Funder's name</funder>
<sponsor>Sponsor's name</sponsor>
<pubPlace>Place of publication</pubPlace>
<date>Year of publication</date>
<series>Series</series>
<ref target="http://www.url.de">additional link text</ref>
<note>some notes</note>
</bibl>
6.4. Enter an article
Entering an article starts with choosing the appropriate template while generating the dataset with the Content Generator. There are no further differences except of the starting template. This is basically two-parted for an article. The surrounding element defines the article or other part of a larger bibliographic item and the inner bibliographic record (with grey background in the author mode) contains the description of the corresponding larger item:
The description of the inner bibliographic item provides the same features as a monographic item. Every described additional information could be added in the same way. Also, the outer bibliographic record could contain additional <author> or <title> elements:
<bibl xml:id="bb-38487173-2"
cmo:doctype="bb" cmo:pubReady="false"
xmlns:cmo="http://www.corpus-musicae-ottomanicae.de/ns/cmo">
<idno type="CMO">test-article-01</idno>
<author>Author of article</author>
<author>Additional author</author>
<title>Title of article</title>
<title>Additional title</title>
<bibl type="in">
</bibl>
</bibl>
7. Persons
7.1. How to encode biographic information
The Person entity is a container for a short biographic summary of a given person. A data set for a person is identified in two ways:
- ID: Technical identifying number generated by the CMO Content Generator.
- Identifier: Verbal identifying siglum as set while generating a data set with the CMO Content Generator.
Whereas the uniqueness of the ID is ensured by the Content Generator, the identifier should be chosen in a unique way to avoid mistakes.
If existing there should also GND numbers be referenced. These numbers refer to entries of the integrated authority file of the German National Library and is commonly used for global crossreferencing and identification of a certain person.
For further information, see:
To add a GND number to a dataset, add an additional <idno> element and choose GND as type:
<idno type="CMO">Reference Person with all fields</idno>
<idno type="GND">118508288</idno>
7.2. Names of persons
The added verbal identifier should not be confused with the name of the person.
By adding more than one name of a person it is possible to record different names under whom a person is known. To distinguish them properly the attribute @type should be used.
You could choose between the types
TMAS-main and
TMAS-other but also type in another descriptive text as long as it is without spaces.
<persName type="latinised">Avicenna</persName>
<persName type="known-under">Ibn Sina</persName>
<persName type="full">أبو علي الحسين بن عبد الله بن سينا</persName>
<persName type="translit">Abū Alī al-Husain ibn Abdullāh ibn Sīnā</persName>
7.3. Information about birth and death of a person
Within
<birth> or
<death> it is possible to type some text, but these elements should be mainly used for storing datable information. For these purposes
TEI provides the
<date> element. It marks not only a piece of text as a date specification, but it also gives the opportunity to normalize it with the use of specific attributes:
<date when="1932-11-11">The 11th of November 1932</date>
<date from="1848" to="1852">ca. 1850</date>
<date notAfter="1836-12">before 1837</date>
<date notBefore="1942-9-20"
notAfter="1942-12-20">in fall of 1942</date>
The "insert date" button in the oXygen Author framework provides the possibility to enter either @notBefore or @from and
@notAfter or @to, if a @when is needed, it has to be entered manually.
For more information see
TEI Guidelines.
With the dropdown box in front of the date element it is also possible to define the basic calendar of the given date. You could choose out of
If conflicting dates of the birth and death of a person should be entered, put additional date elements into the corresponding element. Do not add further <birth> or <death> elements to prevent a loss of data validity!
A person still could be born and died only once in a lifetime, so it is logically wrong to add further elements. In that case we provide more than one definition of the same life event and put them into the corresponding element.
It is also possible to insert bibliographic references to an information. Two ways are provided:
- Adding the reference to the <date> element. (recommended)
- Adding a reference to the <birth> or the <death> element.
If a given information about the birth or the death of a person is homogeneous or it derives just from one source, the position of the reference would not matter. Are there contradictory specifications, each date element must be referenced individually. For purposes of homogeneity it is recommended to put the reference always to the date element.
7.4. Adding biographical information
Further biographical information is stored in an unordered list. Each item can also contain a bibliographic reference.
7.5. Adding bibliographical references
Bibliographic references could be added to nearly every part of a person. They provide further informations about a specific source of an information. A reference will be stored in a
<ref> element. The text of the element should contain the verbal reference like given in a footnote:
<ref>TMAS/II, p. 40</ref>
It is also possible to connect another dataset of the database via this reference, in particular bibliographic items, print and manuscript descriptions. To add a crossreference to the position of the caret, click on the button with the treasure chest for a reference to a bibliographic item, the book for a print and the scroll for a link to an existing manuscript. The verbal reference has to be added also. Only the referencing target is added by choosing the corresponding item and will be converted to a link in the web catalogue:
<ref target="bb-80081264-2">TMAS/II, p. 40</ref>
8. Prints
8.1. Encode the basic source description of a print
- <identifier>
- <titleStmt>
- <title>
The basic description of a printed source contains as every dataset based on MEI an <identifier> element with the chosen identifying label. Below that contains the <titleStmt> the title of the source and the responsibility meta-data:
The standard template contains one <title> element - it is possible to add more - with a describing @type attribute and an <editor> element. Predefined types of a title are:
It is also possible to add a special value by typing into the textbox (don't use spaces).
8.1.1. Encoding responsibilities of a printed source
- <editor>
- <author>
- <sponsor>
- <funder>
- <respStmt>
- <resp>
Like described within the Bibliography chapter it is also possible to add additional responsibilities to the <titleStmt> of a printed source. Just press enter at the desired position of the caret and choose the favoured item from the list. It is also possible to enter a <respStmt> with the bottle button.
8.2. Encoding the imprint
- <pubStmt>
- <publisher>
- <pubPlace>
- <date>
The imprint contains further basic bibliographic informations of a printed source: the publisher, the publication place and the publication date. This information is stored within a <pubStmt> element:
It is highly recommended to use all the possibilities of date normalization provided by the <date> element. In author mode use the steering wheel button to modify the date. Normalization within MEI has only slight differences compared to the usage as described within the Person chapter. The main difference is the name or spelling of the used attributes:
Date normalization attributes:
- @notbefore for terminus post quem
- @notafter for a terminus ante quem
- @startdate for the starting point of a time span (like 'from')
- @enddate for the end point of a time span (like 'to')
The behaviour of the attribute stays the same and so the rules for their formatting (see TEI Guidelines).
It is also possible to define the calendar of the given date.
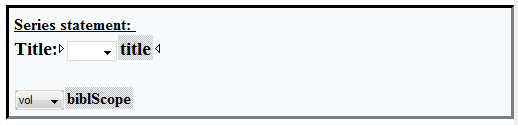
8.3. Using the series statement
Because printed sources published within an series are not uncommon, it is possible to add a series statement (<seriesStmt>) as an optional element to the description of a printed source. For inserting, put in the author mode the caret into the imprint and click on the button Add a series statement to a print. Below the imprint will be a basic series statement added:
A series statement is used to reference to a larger relationship to other printed sources, e.g. fascicules. For adding the part of the series, please choose either volume, issue or page as unit.
8.4. The content description
- <contents>
- <p>
- <contentItem>
- <lb> (line break)
The <contens> element is used as a container for describing the content of a specific source. There are, in general, two options to use it. In a structured form, <contentItem> could be used in order to encode a full table of contents. In a more loose way one ore <p> elements could be used to describe the content in words.
As in the CMO database every musical item is reverenced as a source components there is no special need for a structured table of contents. Therefor the start template generated by the Content Generator provides a <p> to include a verbal description of the content of a source, e.g. with a list of genres or composers.
It is possible to add references of persons to the content description, especially for adding a list of composers. Just use the provided button to enter a link to a dataset of a person.
If you want to set a line break in the description, add a <lb> element. In the Author mode, press enter and choose ‘lb’ out of the list.
8.5. Encoding language information
Within the <langUsage> section is the information about the used languages in the specific source encoded. Every language is described within a single <language> element, containing a verbal description and a language shortcode:
The shortcodes consists of two parts: The first part is a shortcode for the used language, based on ISO 639-3, and the optional second part is the shortcode for the used script alphabet, based on ISO 15924.
It is possible to choose either a version with both parts (language and script definition) or a version with only a language description (without script definition). When dealing with the description of a written source, it is recommended to use the variant with the script description, whereas the variant without script description fits more to a description of spoken and sung languages (e.g. for expressions).
8.6. Using notes
The <notesStmt> collects any notes providing information additional to that recorded in other parts of the bibliographic description. Every single note is put into an <annot> element. It is also possible to declare a type of an <annot> to provide further classification. The value of the @type attribute could be any text string without spaces.
It is possible to use bibliographic references within annotations in print and manuscript descriptions. Use the provided button to add a reference to a bibliographic dataset. Enter a page number in the dialogue and then choose a dataset out of the referencing list.
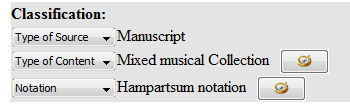
8.7. Classification of a print
- <classification>
- <termList>
- <term>
The classification of a source is one of the main parts of a source description because it provides a basic categorization of a source. A classification of a source consists of three parts, whereas one is prefilled. The possible values of a term depends on the chosen @term-type. The term type could be changed via the provided drop-down menu. To add a new term to the list in the author mode, move the caret on a position within the <termList> and behind another <term> (look for the breadcrumbs on the top), press enter and choose ‘New term’ out of the list.
The modification of the content should be done via the provided buttons. With this procedure a link to a central index file is provided to optimize the searchability. This link is provided via the @cmo:classLink attribute, which contains the ID of the chosen term.
Remark: The ‘Type of Source’ term should not be modified! It is automatically set by the Content Generator.
The class code is added to refer to a certain classifications system. This is usually used to refer to special controlled vocabularies. Within the CMO database we provide our own classification system. This element is only visible in the XML view and not meant to be changed. The @classcode attribute of the <term> is a reference to the <classCode> below the <termList>, which declares the used term as derived from the referenced classification system.
A full source classification will look like this:
8.8. Adding a description of an item
- <itemList>
- <item>
- <physDesc>
- <physLoc>
According to the used FRBR model the <item> element is used to describe a single exemplar of a print, e.g. to document special physical conditions or the location of it. Each described exemplar is referenced by an <item> element within an <itemList>:
A item of a print could be added by clicking on the corresponding button while the caret is within the field ‘Consulted items of this source’.
It is recommended to identify the item by adding a label. Further the item description consists of a physical description and a physical location. The physical description template starts only with a <condition> element, but is fully expandable like in a manuscript description. Also the <physLoc>, the physical location, is used in the same way as for manuscript sources. Add the name of the library, the place, and the shelf mark of the item in this particular library.
Because digitized sources of a print belong always to a particular item, they should not be added directly to the print itself but only to an item of the print. Put the caret to the <identifier> of an item, then add the link by using the corresponding button (see Introduction to CMO oXygen Author Framework).
See also Add digitized sources.
8.9. Referencing musical content
The single musical pieces of a source should be added as source components with the Content Generator and not manually. Their position within the <componentGrp> element defines each component as a part of the described source.
Attention: If changes to a source component will be made manually, either in the Author mode or in the XML view, please ensure, that the <componentGrp> element must not be deleted. Otherwise the Content Generator will not be able to add new source components to this dataset!
9. Manuscripts
9.1. Basics of manuscript descriptions
MEI does not distinguish between printed sources and manuscripts, their're all treaten as sources. All sorts of element containers provided for sources decriptions could be used, but some of them are more suitable for manuscript sources and others for the description of prints. (Compare this chapter with the description of print datasets.)
The identifier of a manuscript is used like in a print dataset. It contains the label determined through the dataset creation process.
9.2. The physical description
- <physDesc>
- <dimensions>
- <extent>
- <physMedium>
- <cmo:scriptDesc>
- <condition>
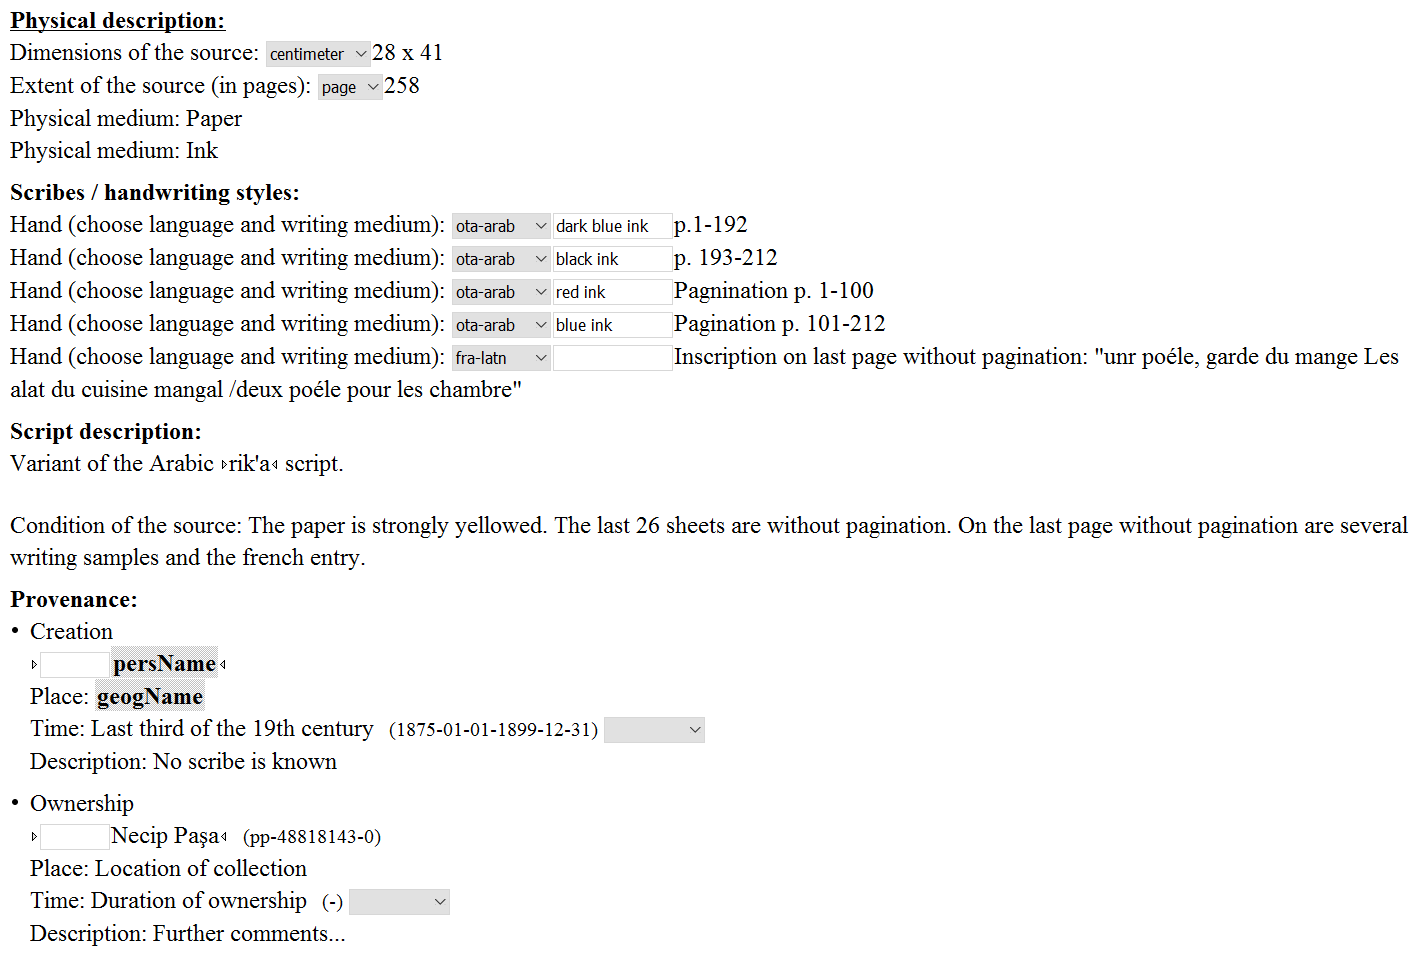
Almost the main part of a manuscript dataset is the physical description of the source, contained in the <physDesc> element. This provides several elements to encode the used material, the condition of the source, but also information about scribal hands and the provenance.
The <dimensions> element contains the physical size of a manuscript. With the drop-down menu it is possible to set the @unit attribute, to declare in which unit the size of the source is measured.
The <extent> element contains the size of a source in other than physical dimensions, in our particular case the number of pages of a source. The drop-down menu, which sets the @unit attribute, contains only ‘page’ as possible entry.
The <physMedium> element contains information about the materials of the source, e.g. paper and ink. All materials could be described either in a single element or multiple elements, one for each material.
The <cmo:scriptDesc> is a special container for CMO to add a description of the used script. It contains a description of the particular usage of scripts within a <p> (paragraph) element. A further classification of the used alphabet within the source should be given via the language description.
The physical description also consists of a description of the condition of the manuscript, it will be added in the <condition> element.
9.2.1. Scribal Hands
A special section of the physical description also allows to identify different scribal hands. These informations are stored within <handList>. Every scribal hand, respectively every distinct handwriting style, should be recorded in a single <hand> element.
The text field of the element is used for the particular description of the hand / writing style. In addition, the language used by the particular hand could be defined via the dropdown menu. The textbox fills the @medium attribute to store information about the used script medium, e.g. type of ink.
If a certain scribe is known and availabe as a person dataset in the database, it is also possible to add a reference to this person by moving the caret to the hand description and adding a reference to a person via the corresponding button.
There are some overlappings with the descriptions with <physMedium> in the case of writing materials. On the one hand writing materials, such as the type or color of ink, could be described as physical medium, on the other hand they could indicate different scribes and could serve as a description of the writing medium within the description of scribal hands. If no implications of scribal hands or writing styles are desired, it should be prefered to use <physMedium>. In cases involving a certain evidence on scribal hands, the information should be either doubled or put into the description of a scribal hand.
9.2.2. Provenance
- <provenance>
- <eventList>
- <event>
The provenance of a manuscript is also one of the main parts of a source description. It is stored in the <provenance> element.
To depict a full history of a manuscript, it is recommended to use the <eventList> element as a container for the description of numerous events, e.g. the creation of the manuscript, different ownerships or the destruction.
Every special event is stored in a <event> element. It can contain several elements for a proper description, e.g. a <head>, <persName>, <geogName>, <date>, and a <p> for a detailed description. The <head> (heading) element serves as a short categorisation of the described element whereas the other elements give the detailed information.
Every manuscript starts with an event for the creation of a source. Other events could be added with the corresponding button of the CMO oXygen framework.
It will start with a <head>, an empty <persName>, an empty <geogName>, <date> and <p> element. A date could be entered via the corresponding button, also references to person datasets could be done. The <geogName> should be filled manually, as the further description within <p>. For more detailed description it is possible to add additional <p> elements manually. It is also possible to add bibliographic references within a paragraph by using the button for adding references to bibliographic records. First, a window pops up asking for the page to be referenced, then the list of existing bibliographic records opens. After chosing a record, the reference is put on the position of the caret.
9.3. The physical location
- <physLoc>
- <repository>
- <corpName>
- <geogName>
- <identifier>
The location of a manuscript will be stored within the <physLoc> element. It serves as a container for a <repository> element, containing the particular information about the holding agency. The name of the library should be put into a <corpName> element, the location into a <geogName> element. The shelf mark of the particular source should be entered in the <identifier> element:
9.4. Adding a link to a digitized source
- <availability>
- <acqSource>
- <ptr>
- <accessRestrict>
- <useRestrict>
It is possible to add a link to a digitized source to a manuscript description, please use the corresponding button in the author view.
The reference to a digitized source consists of a link, stored in a <ptr> element inside the <acqSource>. It is also possible to add further text to this element. In addition, informations about access restrictions and use restrictions should be added. Use the dialogue box for entering basic informations.
10. Source components
10.1. The role of the source component in the CMO database
Source components are the main referencing object for source descriptions. Whereas the whole source could only serve as referencing source e.g. for names of persons, they cannot be the referencing object for the musical content. As a referencing point for the description of the musical content, a object comparable to a Fundstelle is needed. This role is achieved by the so called source component. Within the FRBR model the source is to be understood as the manifestation entity, but because a source in whole including a music collection could not serve as the corresponding referencing object, each Fundstelle should be distinguished and provide a referencing anchor.
The division of a source into smaller depending portions is achieved with the <componentGrp> element. It declares every child element to be treated as an ‘isPartOf’ relation to the parent element.
Therefor a source component is a depending <source> element within the <componentGrp> of its parent source description. It combines the functionality of an independent dataset (referencing) with the purpose of describing the content of a larger dataset. Consequently a source component is not stored in an independent xml file but within the file of its parent source.
Further reading:
10.2. Creation of source components
Because of the referencing function, a source component should possess a valid technical ID and a unique label. To provide these, a source component has to be created with the Content Generator. It is mandatory to choose a parent source in the creation process to add it to its depending source dataset.
10.3. Describing a source component
- <componentGrp>
- <titleStmt>
- <title>
- <composer>
- <relationList>
- <relation>
The main goal of the description of a source component is to link to the descriptions of the musical content, but it also serves as a Fundstelle. Within the <titleStmt> could be entered a <title> as well as a <composer> but in contrast to the description of the musical content within an expression, the source component depicts the reading of the described parent source. So, even if the title / heading is spelled wrongly or the attribution to a composer is defeasible it should be given as it is within a source component.
In addition a source component could include several more depending source components, e.g. for describing a Fasıl or a Takam structure. To add a new source component to an existing one, use the Content Generator. Choose as depending source the desired source component from the list.
10.3.1. Classification of a source component
To encode a collection of e.g. Takamler, it is possible to add a classification to a source component with the provided button or by hand. Put the caret between the <titleStmt> and the <relationList> (the breadcrumbs on top should mark the position at <source>), then press enter, choose <classification>, then add a <termList> and a <term>. Fasıl or Takam are availabe options for the Type of content. The other term types should not be needed within source components.
10.3.2. Sorting of source components
It is also possible to add a sorting attribute to each source component. It is found in the Author view on the top of each source component. In the XML view it is provided by a @n (numbering) attribute within the <source> element. It could be filled with a natural number, e.g. 1, 2, 3 etc. The number declares the sorting of the source components in the webbased Catalogue and doens't inflict the oXygen entry mask. The sorting is related to the specific level of source components, not to those in descending levels. If you have more than one levels it would be sorted like this:
- Component 1
- Component 2
- Component 1
- Component 2
- Component 3
- Component 3
10.3.3. Relations of a source component
As a main part, every source component contains a <relationList> to store the references to one or more expressions.
Every relation is encoded as a <relation> element, containing the type of FRBR relation - in this particular case it is always the type ‘isEmbodimentOf’ to connect an expression - and the reference to the related expression. For displaying purposes also the label of the expression is stored within the @label attribute.
To add a relation to a source component, put the caret to the particular position and use the corresponding button and choose the desired expression from the list.
11. Expressions
11.1. The role of the expression in the CMO database
The <expression> element is the MEI implemented version of the FRBR entity ‘expression’. It is defined as:
‘the intellectual or artistic realization of a work in the form of alpha-numeric, musical, or choreographic notation, sound, image, object, movement, etc., or any combination of such forms.’ (Functional Requirements of Bibliographic Records. Final report.)
As the work entity it is also an abstract entity.
‘An expression is the specific intellectual or artistic form that a work takes each time it is "realized." Expression encompasses, for example, the specific words, sentences, paragraphs, etc. that result from the realization of a work in the form of a text, or the particular sounds, phrasing, etc. resulting from the realization of a musical work. The boundaries of the entity expression are defined, however, so as to exclude aspects of physical form, such as typeface and page layout, that are not integral to the intellectual or artistic realization of the work as such.’ (FRBR 3.2.2)MEI adapts the expression in way similar to the description of a musical work. It shares most of the possible child elements with <work>, also when the relation between a work and an expression is encoded hierarchically, an expression could inherit the properties of its related work.
The CMO databases uses expressions as the main entity for describing the musical content, whereas the work dataset is mainly used as abstract collection of expressions. Each expression is to be understood as one particular variant of a musical work, which is embodied in one or more sources. These embodiments of an expression are the related source components. In that way the connection of a musical work to its variants found in one or more ‘Fundstellen’ are constituted in the model of the database.
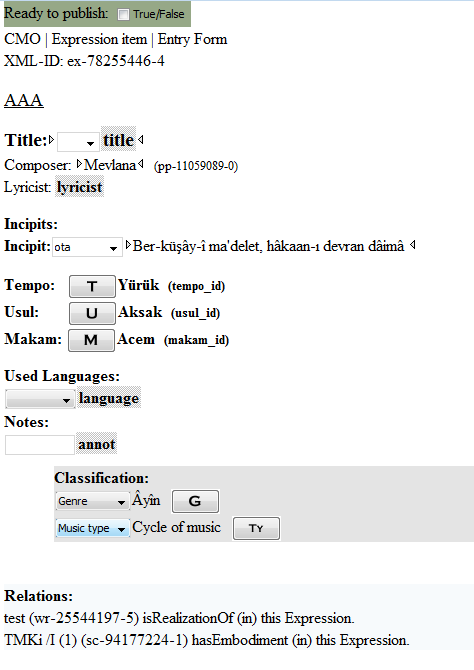
11.2. How to describe an expression
- <identifier>
- <titleStmt>
- <title>
- <composer>
- <lyricist>
Like the source description, the description of an expression starts with the <identifier> containing the label of the expression. And as for the prints, a <titleStmt> contains all title and responsibility data.
The starting template after the creation of an expression starts with a <title> (the drop-down provides different types), a <composer>, and a <lyricist> element. Also available is a <respStmt> element for secondary responsibilities:
<identifier type="CMO">NATM p. 6</identifier>
<titleStmt>
<title>Isfahan Beste</title>
<composer/>
<lyricist>
<persName dbkey="tech_id">Nabî</persName>
</lyricist>
<respStmt>
<resp>Transcriber</resp>
<persName dbkey="tech_id">Suphi Ezgi</persName>
</respStmt>
</titleStmt>
Beyond these title and responsibility information an expression contains information about the musical parameters, the lyrics, and the relations to other database items.
11.2.1. The incipit
The <incip> element could contain a full incipit of a piece of music, including also encodings of the music e.g. in MEI or plaine and easie code, but the CMO database contains in this state only the incipit texts. An icipit text is stored in a special <incipText> element inside <incip>. The <p> element is a common container for a text phrase.
It is possible to add further <incipText> elements by using the corresponding button. It is also possible to define the language of an incipit text, e.g. to distinguish a provided translation of it.
<incip>
<incipText xml:lang="tur">
<p>ğel ir nesin-i-saba hat-ı-yardan ne haber</p>
</incipText>
<incipText xml:lang="eng">
<p>(translated version)</p>
</incipText>
</incip>
11.2.2. The musical parameters of an expression
- <tempo>
- <cmo:usul>
- <cmo:makam>
As musical parameters of an expression tempo, makam and usul could be entered in special CMO related elements.
The element value could be any text, in order to provide the possibility to add different spellings or leave it empty, if the information is not explicitly available in the expression. To add a normalized definition of a musical parameter, use the provided button. It adds a link to the normalized parameter index and provides the possibility to add implicit and easy searchable information to an expression.
Attention: If you type something as a text value before choosing the normalized definition of the parameter, the text vanishes during this process.
<tempo cmo:classLink="tempo_id"
label="tempo_name"
xmlns:cmo="http://www.corpus-musicae-ottomanicae.de/ns/cmo">Yürük</tempo>
<cmo:usul cmo:classLink="usul_id"
label="usul_name">Aksak</cmo:usul>
<cmo:makam cmo:classLink="makam_id"
label="makam_name">Acem</cmo:makam>
11.2.3. The lyrics description
The lyrics description is meant to describe the lyrics of a piece of vocal music. It contains the <cmo:lyricsMeter> element for informations about the meter of a text. It consists of a <name> element and a <cmo:structure> element. Both could contain text.
To describe the rhyme schema of a text, use the <cmo:lyricsRhyme> element. It is also only allow to add text into it.
The <cmo:literaryForm> element defines the literary form of the lyrics. It links to a special index file, like the classification or the musical parameters. To add a literary form click on the button and choose a value from the list. It is possible to change the spelling afterwards (see musical parameters.
<cmo:lyricsDesc
xmlns:cmo="http://www.corpus-musicae-ottomanicae.de/ns/cmo">
<cmo:literaryForm cmo:classLink="lf-24518214-2"
label="İlâhî">İlâhî</cmo:literaryForm>
<cmo:lyricsMeter>
<name>Hezec</name>
<cmo:structure>mefâ‘îlün fa‘ûlün mefâ‘îlün fa‘ûlün</cmo:structure></cmo:lyricsMeter>
<cmo:lyricsRhyme>some text...</cmo:lyricsRhyme></cmo:lyricsDesc>
11.2.4. The languages of an expression
The language description is used to note every language used within an expression, especially for vocal music. It is used like in the prints and the manuscripts. Since the expression describes a certain piece of music, the language shortcodes including a script tag should only used exceptional, because a sung language does not depend on a script.
<langUsage>
<language xml:id="tur">Modern Turkish</language>
</langUsage>
11.2.5. Using notes and classification
The notes of an expression is used like in print (see notes) and manuscript datasets.
Only the classifications are slightly different because other categories are available:
- Genre, to describe the particular genre
- Music type, to describe the genre in a broader sense as ‘Vocal music’, ‘Instrumental music’, or a ‘Cycle of music’
The modification of the content should be done via the provided buttons. With this procedure a link to a central index file is provided to optimize the searchability. This link is provided via the @cmo:classLink attribute, which contains the ID of the genre or music type.
<notesStmt>
<annot type="type_of_note">Some note to this particular expression</annot>
</notesStmt>
<classification>
<termList>
<term cmo:term-type="genre"
classcode="#cmo_classes" cmo:classLink="cmo_genre_id">Beste</term>
<term cmo:term-type="music type"
classcode="#cmo_classes" cmo:classLink="cmo_genre_id">Vocal music</term>
</termList>
<classCode authority="CMO"
xml:id="cmo_classes"/>
</classification>
11.2.6. The relations of an expression
As described in the source component chapter, also the <expression> contains a <relationList> element to collect the relations to source components and works. The reference to the corresponding dataset is stored in the @target attribute, the @label contains the label of the connected dataset for referencing purposes.
The @rel attribute contains the type of FRBR relation:
- ‘hasEmbodiment’ is a relation from an expression to a source component (manifestation)
- ‘isRealizationOf’ is a relation from an expression to a work
<relationList>
<relation rel="hasEmbodiment"
target="sc-21572945-9" label="NATM p. 1"/>
<relation rel="isRealizationOf"
target="wr-25544197-5" label="test"/>
</relationList>
11.3. Expression Components
To provide a way to describe the multiparted structure of an Ayin expression components are available. They’re used like source components but depict smaller parts of a piece of music.
To create an expression component, please use the Content Generator. Expression components provide all fields available for a expression.
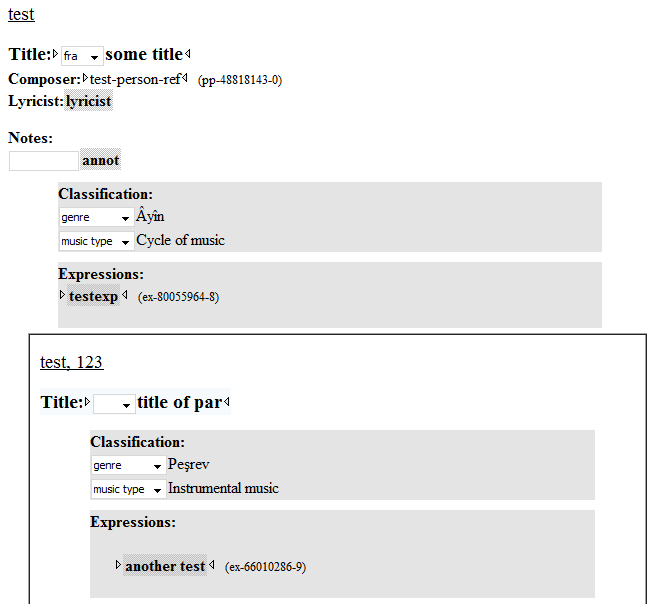
12. Works
12.1. The role of the work in the CMO database
The work dataset is one of the datasets in the CMO database implementing the FRBR model. Its corresponding MEI element is the <work> element. In FRBR, a work is defined as: ‘a distinct intellectual or artistic creation.’ (FRBR, 3.2.1) It is an abstract entity as no single material object can point on a work itself. It is only recognizable through its realizations (see expression). Boundaries of a work are not precisely definable and may ‘be viewed differently from one culture to another’ (see FRBR 3.2.1).
In the CMO database the work acts as ‘collection of variants’. Its main function is to provide an abstract container relating different expressions by connecting them to a certain work object.
12.2. How to describe a work
Because of its special character, a work does not contain many descriptive elements in the CMO database. It is identified by an <identifier>, contains a <titleStmt> (see expressions for more information), notes (see notes) and a classification.
The classification features provided are similar to those of the expression. Further there is the possibility to add notes, e.g. to discuss the connection between the related expressions.
In the title statement it is possible to add more titles or to insert more than one person into <composer> or <lyricist> and to add a bibliographic reference for a <persName> (the reference is found in the @analog attribute),in order to depict contradictory attributions.
12.3. Bibliography
It is possible to add a bibliography to a work dataset.
This is the recommended way to store auxiliary sources for the edition of lyrics, but it could be used also for further references to relevant datasets.
Because the bibliography is an optional element, it is not part of the basic dataset generated by the Content Generator. To create a list of bibliographic references, use the shelf button of the oXygen Framework. Afterwards, bibliographic items, prints, and manuscripts could be added with the correspronding buttons.
12.4. Work Components
As the expression components the work components serve as description entities of multiparted musical structures, e.g. in suites, song cycles, masses, operas, symphonies, and Ayinler. The work component provides all fields a work is providing, it's just a work in a work. To create an work component, please use the Content Generator.
13. Administration Guidelines
13.1. Using the CMO Database check routine
The check routines provided via the CMO oXygen Framework allow to run several tests of data consistency. Now implemented tests are:
- Has every index entry an existing dataset?
- Has every FRBR relation within a dataset an existing counterpart?
The check routines are available in oXygen as long as any file of the database in opnened. Click on this button:  or navigate in the menu to Document -> Transformation -> Apply Tranformation Scenario(s). It is also possible to use the shortcut Ctrl+Shift+T.
When running the scenario a window on the bottom of oXygen will be opened. It informs about the running tasks and occurring errors. After the scenario has finished, you could close the window by clicking on the X on the tab below it.
The result of the tests can be seen in the text files which automatically opened in the oXygen Author.
13.1.1. Index check
The index check searches the index files and looks for a dataset in the files for every index entry. It throws an error for each index entry without corresponding dataset. The result file will look like this:
CMO Database Index Check
2016-04-07T17:45:14.574+02:00
-----------------

Bibliography
Total number of items: 11
Number of available documents: 10

no file for: Annas Diss - bb-88576929-3
-----------------
Every entity type is analyzed separately. The result contains the total number of index entries, the number of available documents and a list of missing documents, named by identifier and technical id. If the files are missing because they were deliberately deleted, those index entries need to be removed also.
13.1.2. FRBR relation check
In every existing print, manuscript, expression, and work file will be searched for relations to source components, expressions, and works. If a relation leads to a non existing dataset, an error will be printed in the result file FRBR_check.txt.
13.2. Delete datasets
Remark: The deletion of a dataset is only necessary if a source component is part of a wrong source (or a expression and/or work component has the wrong parent dataset) or if a dataset exists twice in the database! Otherwise it is easier to rename.
If a dataset should be deleted it is always necessary to delete the dataset itself and to delete the link to the dataset in the corresponding index file.
In every case of deletion, you need the technical ID of the concerned dataset.
Remark: Please be sure, that a dataset is not referenced by other parts of the dataset, because these references will not be removed via this process. Otherwise, clean the references in case of a double entry or think about renaming the entry.
13.2.1. Delete a non-component dataset
Every non-component dataset is a unique file. To delete a whole dataset, just delete the file from the corresponding folder. The filename is the technical ID, e.g. ex-53129815-6.xml. After the file is deleted, you have to delete the link to it in the corresponding index file.
These datasets are unique files:
- Bibliography
- Expression
- Manuscript
- Person
- Print
- Work
Remark: The deletion of a dataset will also delete every depending component!
If you don't want to delete also the depending components, try to rename instead.
13.2.2. Delete a component
For deleting a single component, you have to modify the file of the superordinate dataset, because a component is not a single file but always a part of a larger dataset.
These datasets are components:
- Source component (within prints or manuscripts)
- Expression component (within expressions)
- Work components (within work datasets)
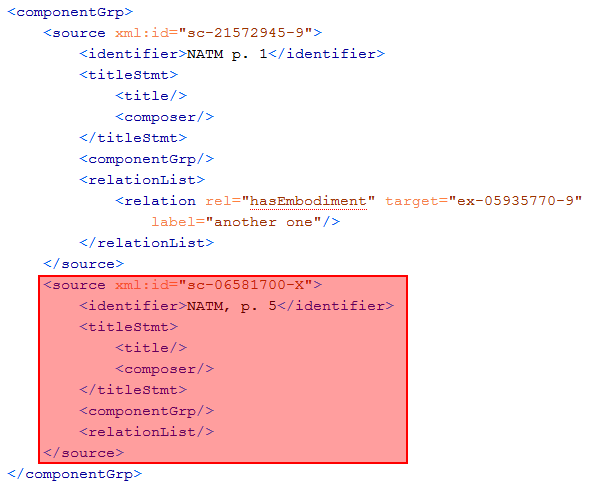
So, first of all, you have to identify the superordinate dataset, open it and switch to XML view. Every component is part of a <componentGrp> element.
To navigate through the plain XML, look out for the indentions. Every opening and closing element on the same hierarchy is usually recognizable by the same amount of indentions. In the example above you see the parenting <componentGrp> element with two <source> elements inside. Every of them has a single xml:id, which is the technical ID of it. Identify the the dataset by this ID and delete everything from the opening <source xml:id="sc-06581700-X"> to the closing <source>.
Remark: If there are a lot of source components, especially with other depending components, pay some attention.
Remark: After deleting the lines of the dataset, look out for error messages of oXygen. It should warn you, if the file is not well formed anymore. You could also use the button to validate the file or try to switch to Author mode. If switching is not possible, redo and try again.
If everything is okay, the next step is to delete the link from the corresponding index file.
13.2.3. Delete dataset from index file
After deleting the dataset, you have to delete also the link out of the index file, to delete the item from the referencing lists in the Content Generator and the referencing function of the oXygen framework.
It depends of the type of dataset, which index file should be modified:
| Dataset type | Index file |
| Bibliography | _index\bibliography.xml |
| Expression | _index\expressions.xml |
| Expression component | _index\expressions.xml |
| Manuscript | _index\manuscripts.xml |
| Person | _index\persons.xml |
| Print | _index\prints.xml |
| Source component | _index\sourceComponents.xml |
| Work | _index\works.xml |
| Work component | _index\works.xml |
In this file, firstly you should have to switch to XMLview, because it is forbidden to modify it in the Author view. Then you have to look for the entry, you want to delete. The easiest way, is to use the search function of oXygen and look for the technical ID.
If you found it, you should see and <item> element like this one:
<item xml:id="sc-06581700-X">
<idno>sc-06581700-X</idno>
<p>NATM, p. 5</p>
<link target="..\\prints\pr-74120913-3.xml#pr-74120913-3"/>
</item>
Every entry of the index is a single<item> element within a list. It contains the technical ID twice, once in the <item> element as attribute and secondly within the <idno> element.
The <p> element contains the given identifying label and the <link> elements contains the reference to the dataset (or the superordinate dataset if its a component).
To delete the link in the index file, remove all the five lines from the file, beginning with <item ... and finishing with <item>.
Then, save your changes. After deleting the dataset itself and its link, please remind to push your changes immediately to the repository.
13.3. Renaming of datasets
By renaming a dataset the references and the technical ID are not lost. If an error in the identifying label occurred, it is easier to rename it.
The first step is to change the label in the dataset itself.
After changing the label, modify the identifying label also within the index file.
Open the corresponding index file, switch to XML mode, look out for the entry with the technical ID of the affected dataset. Then modify the text within the <p> element. At last, save your changes and push to the repository immediately.
13.4. Modifications on thematic index files
Beside the index files containing the links to existing datasets, there are a some further index file in the "_index\" directory of the database:
- calendars.xml
- genres.xml
- makamler.xml
- tempi.xml
- usuler.xml
The calendars.xml contains the basic TEI compliant calendar references for the persons. The modification of the calendars need more work to do from the technical side, so this index file is not explained in this manual.
The other files follow quite the same structure as the other index files, except some slightly logical changes:
Here also one entry is a single <item> element with depending child elements. Every entry has its own ID as xml:id attribute. These IDs are generated like other technical IDs in the database. The first two letters mark the type of ID, in this example it is an ID for a makam.
The <idno> element contains the standardized spelling for the item. It is important to avoid any usage of typewriter apostrophes in these standardizes spellings, but only typographic correct Unicode symbols (see Wikipedia: Apostrophe, green ones are okay). Otherwise it is not possible to reference to an item. For an explanation how to insert typographic correct apostrophes also follow the given link.
Within the <p> element alternative spellings of the entry are stored. Every alternative spelling is separated by a comma. If an additional spelling should be entered, just insert it into this list.
If no alternative spellings are stored, change the <p> element from the shortcut form ‘<p />’ to the form with opening and closing tag: <p> </p>. Then put the alternative spelling in between the opening and the closing tag. (Compare the other entries and adapt the form of them.)
If a new entry is needed, insert the entry as far as possible and send a request for the newly generated technical ID. As soon as the technical ID is generated, the entry is could be referenced in the database.
13.5. Brief guide to technical IDs
The technical IDs are used for identifying every dataset uniquely and for cross-referencing from one dataset to another. A reference is a special type of XML attribute which contains a technical ID as a link or a footnote to the referenced dataset. These references will be translated technically into hyperlinks.
Every technical ID consists of three parts each divided by a hyphen. The first part is a two letter abbreviation for the entity type of the dataset of an ID, the second part is an eight-digit random number and the last part is a check digit, which is calculated on the basis of the middle part (see Wikipedia: Check digit).
The technical ID is used to identify datasets as well as terms for the CMO classification system.
Here is an overview of every object type with a CMO technical ID and its particular abbreviation:
Dataset types
- Bibliography - bb
- Expression - ex
- Expression Components - ec
- Manuscripts - ms
- Person - pp
- Print - pr
- Source Component - sc
- Work - wr
- Work Component - wc
Classification types
- Content Type - ct
- Genre - gn
- Literary form - lf
- Makam - mk
- Notation type - nt
- Source Type - st
- Tempo - tp
- Usul - us